These Homemade Chocolate Yogurt Gummies are my favorite sort of toddler recipe. I love making “fun food,” and these treats are much easier than you might expect. Plus, they’re a yummy chocolatey treat for Valentine’s Day or any day of the year!

We’re big fans of homemade fruit snacks in my house, and we love these Chocolate Yogurt Gummies. It’s no secret that I love yogurt and I often include it on my lists of snacks and meal components for babies and toddlers.
Quick Look: Chocolate Yogurt Gummies
- Prep Time: 10 minutes
- Cook Time: 10 minutes
- Total Time: 20 minutes
- Serving: 4-6
- Flavor Profile: Lightly sweet cocoa flavor with hints of vanilla
- Difficulty: Easy, perfect for everyday snacks and desserts
- Why to Make: It’s a quick and yummy way to make homemade gummies
SUMMARIZE & SAVE THIS CONTENT
Table of Contents
Whole milk yogurt is filled with good stuff that little ones need—fat for their developing brains, calcium and vitamin D for strong bones, and protein for growing muscles.
Since Chocolate Yogurt is already very flavorful, you don’t need any other ingredients apart from milk and gelatin.
Why This Recipe Works
A batch of these homemade gummies comes together in about 5 minutes and after a few hours in the fridge, you’ll have enough homemade gummies to share!
(You may also like Chocolate Avocado Pudding, Healthy Brownies, and Homemade Chocolate Milk. Plus more tips on yogurt for babies and toddlers, too.)
Ingredients You Need
Here’s a look at the ingredients you need to have on hand to make Yogurt Gummies so you know what to pick up from the store or have ready.
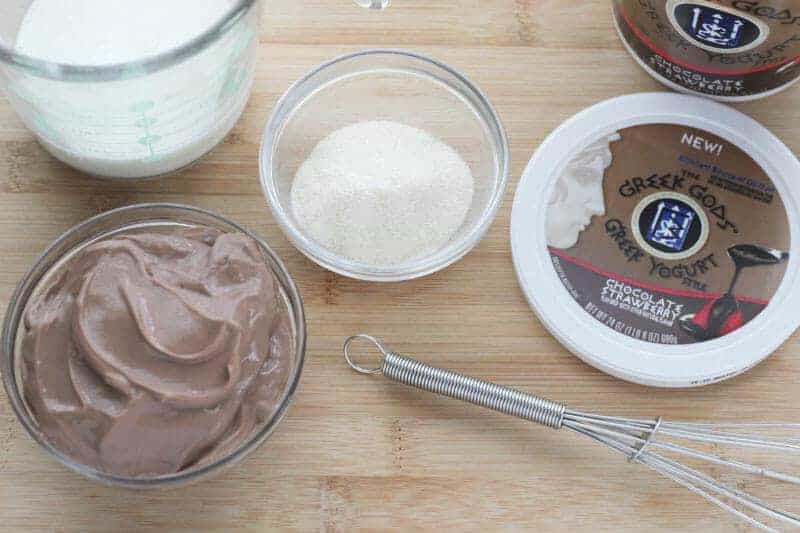
- Chocolate yogurt: I like to use chocolate yogurt to make this super easy, but you can also use plain yogurt and add a few ingredients to get that chocolate flavor.
- Whole milk: A little whole milk makes the yogurt thin enough to turn into gummies and also is a liquid in which you can dissolve the gelatin.
- Unflavored gelatin: This helps the mixture to solidify when chilled turning them into homemade gummies.
Your toddler won’t eat? Help is here!
Sign up for our email updates to get tips and ideas sent your way!
How to Make Chocolate Yogurt Gummies
Here’s a look at how to make this Chocolate Yogurt Gummies recipe. Scroll down to the recipe for the full info.
- Coat a silicone candy mold lightly with nonstick spray. Set aside.
- Place the yogurt into a medium bowl and sprinkle the gelatin over top. Stir to dissolve.
- Warm the milk and stir vigorously into the yogurt mixture until completely smooth. Spoon into prepared mold.
- Refrigerate and serve.

How to Store
Once firm and removed from the molds, you can store these Yogurt Gummies for up to 5 days. I like to line an airtight container with a paper towel to absorb any excess moisture.
Best Tips for Success
- I used this heart silicone mold and made 20 gummies. (Each was just over 1 tablespoon of the mixture.)
- You can also pour the mixture into a baking dish and slice into squares if you prefer.
- You might want to add a tablespoon or so of honey if you want them sweeter—simply taste the mixture before putting it into molds and adjust as needed.
- Try to dissolve the gelatin fully for the best final texture.
- Serve as a snack or dessert with a side of berries or other fruit.
More Easy Treats


I’d love to hear your feedback on this post, so please rate and comment below!

Homemade Chocolate Yogurt Gummies
Ingredients
- 1 cup chocolate yogurt
- 1/2 cup whole milk
- 3 packets plain gelatin (about 7 teaspoons or ¾ ounce)
Instructions
- Coat a silicone mold with candy-size openings lightly with nonstick spray. Set aside.
- Place the yogurt into a medium bowl and sprinkle the gelatin over top. Stir vigorously with a whisk for about 1 minute or until gelatin is dissolved. (It may have a few lingering lumps.)
- Warm the milk until just about boiling, about 1 minute in the microwave. Let sit briefly, for about 30 seconds, and stir vigorously into the yogurt mixture for 1-2 minutes or until completely smooth.
- Spoon mixture into prepared mold.
- Refrigerate for at least 2 hours or overnight. Carefully remove from mold and serve cold.
- Store in the fridge for 3-5 days in an airtight container lined with a paper towel (which will absorb any excess moisture.)
Notes
- I use regular Knox gelatin here since it’s much more accessible and affordable than the grass-fed kind, though I understand if you prefer to go that route. Let me know if you try it that way!
- Try to dissolve the gelatin fully for the best final texture.
- Once firm and removed from the molds, you can store these for up to 5 days. I like to line an airtight container with a paper towel to absorb any excess moisture.
- Serve as a snack or dessert with a side of berries or other fruit.
Nutrition
This post was first published February 2017.


Can you plain yogurt instead of chocolate?
Yes, though you’ll need to stir in 1 tablespoon (ish) cocoa powder and 1 tablespoon honey or maple syrup (or to taste to get it to a nice sweetness level)