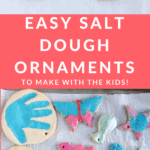
Learn how to make classic salt dough with the kids, with baking, painting, and storage info. This method is straight forward, easy, and thorough—and they a perfect kids holiday gift for grandparents, teachers, and loved ones!
Salt Dough
This salt dough is a staple of childhood and I love doing this Christmas activity with my kids each year—and throughout the rest of the year too! We love to make salt dough handprints, ornaments, and sometimes, just any old shape they want to. It’s an easy project that we can do together—and then share as kid-made holiday gifts, keepsakes, or house decorations.
Salt Dough Recipe
Making salt dough at home is as easy as combining three pantry staples together into a dough. It’s fairly fool proof (as long as you follow the measurements!) and is a recipe that even little kids can help make.
Ingredients in Salt Dough
To make this recipe, you’ll need:
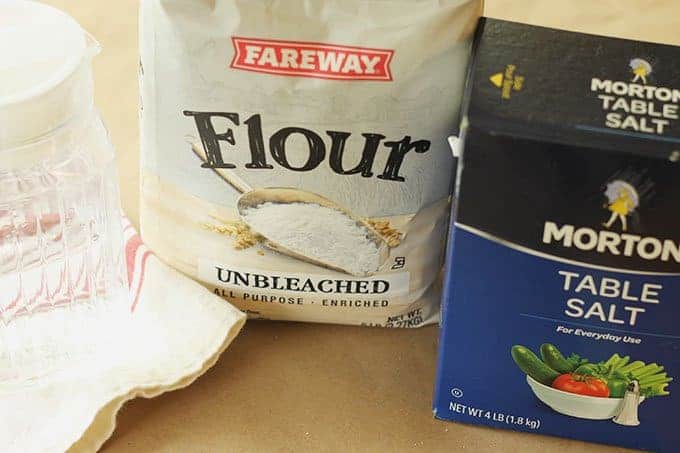
- table salt
- all-purpose flour
- water
TIP: That’s it! (I buy store brand, cheap flour for this since project to keep it very budget-friendly.)

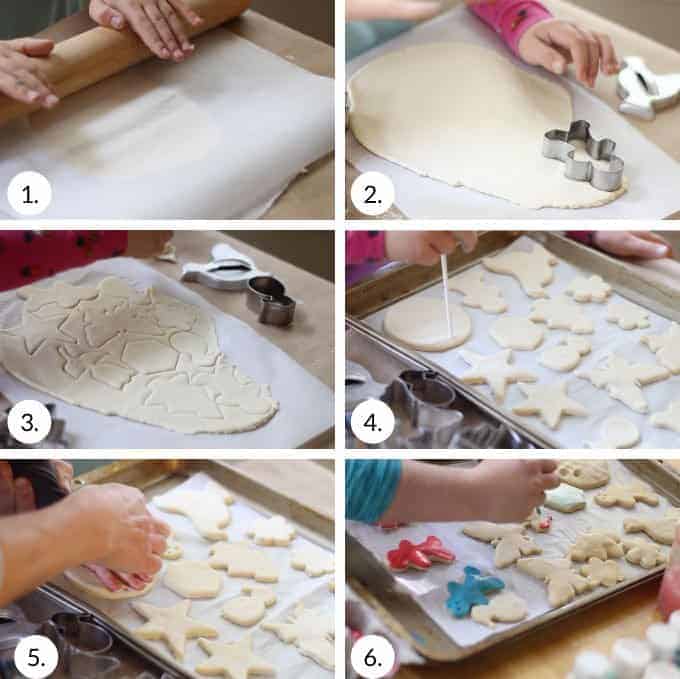
How to Make Salt Dough Ornaments Step-by-Step
Here’s a look at how to make the dough for this salt dough. Scroll down to the bottom of the post for the full information.
- Measure out the flour and water. (photo 1)
- Add the water. (photo 2)
- Stir with a wooden spoon. (photo 3)
- Keep stirring until the dough is mostly together and is hard to stir any longer. (photo 4)
- Knead a few times with hands to bring the dough together. (photo 5)
- Place dough between two pieces of parchment paper and roll out. (photo 6)
TIP: You can divide the dough in sections so multiple kids can have their own dough to work with.
How to Cut Out, Bake and Decorate Salt Dough Ornaments
Once you start rolling, here’s a look at what will follow if you want to make these into ornaments. (Skip the hole poking if you want to just make these as shapes for the kids to paint.)
- Roll out, changing directions occasionally, until about 1/4-inch thick. (This may not get precise if you’re working with kids and that’s okay!) (photo 1)
- Stamp cookie cutters. (photo 2)
- Remove the dough around the shapes, then either transfer the whole piece of parchment paper to a cookie sheet OR transfer just the shapes to a parchment-lined cookie sheet. (photo 3)
- Poke holes so you have a place for a string to hang as ornaments. (photo 4)
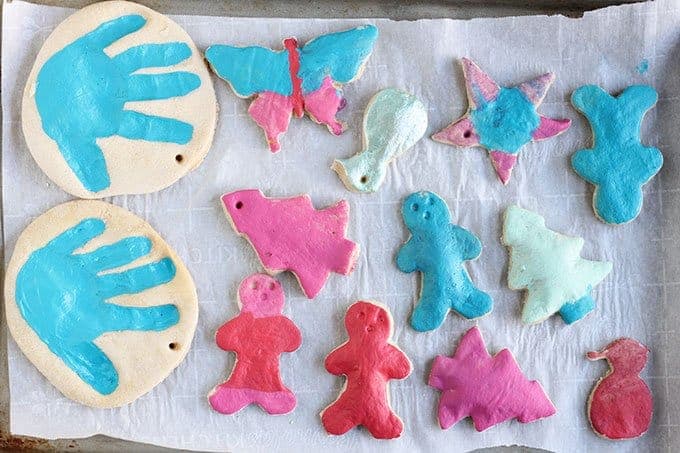
- Press in a hand to make a handprint, if desired. (photo 5)
- Bake, let cool and decorate! (photo 6)
TIP: Re-roll any remaining dough after Step 3 here to make additional ornaments.
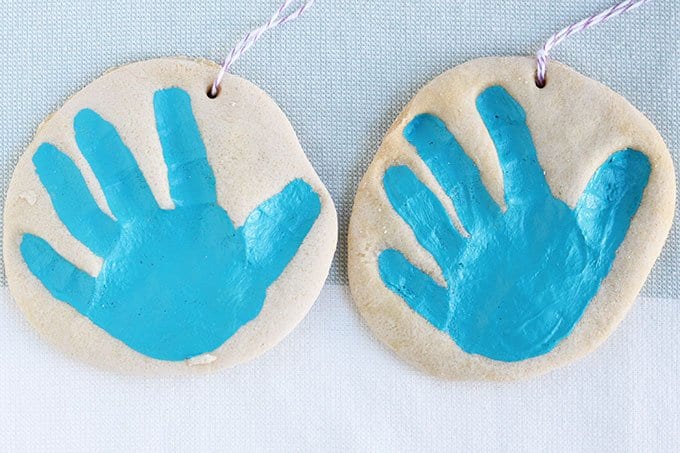
Salt Dough Handprint Ornament
Capturing a handprint in salt dough is a perfect grandparent gift, or a keepsake ornament to make for your own tree. I love pulling out our little collection year after year. Know that getting a good print may take a few tries if doing a baby’s hand!
TIP: Check the size of your round cookie cutter against your child’s hand to make sure that it’s big enough. You may need one that’s 4-5 inches in diameter.
Best Paint for Salt Dough Ornaments
If the kids are wearing smocks, the table is protected, and you are reasonably sure they won’t paint all over their hands and faces, I like using regular acrylic craft paint since it holds up best on crafts. With younger kids who may wind up wearing more of the paint, I’d recommend tempura washable paints.
TIP: We put our paint into the base of old egg cartons since we always have those on hand. You can also use paper plates.
How to Preserve Salt Dough Ornaments
To help preserve your finished dried ornaments, you can coat with a layer or two of Mod Podge or spray with a sealer. Either work well. I’d recommend coating or sealing both sides, so do one side and let it dry, and then do the second side. If using the sealer, do it in a well ventilated area without the kids too close by.
TIP: To store these ornaments from year to year, you’ll want to wrap in bubble wrap. Store in a container that won’t be banged around, dropped or exposed to excess moisture.
Why is my salt dough puffing up?
If you mistakenly use self-rising flour, they may puff. And sometimes it happens randomly. Keep the oven temperature low and if it happens consistently, you can try baking at an even lower temperature for a slightly longer amount of time.
Tips for Making the Best Salt Dough Ornaments
- If the dough is too wet and sticky, knead in a little more flour. If it’s too stiff, add a little more water. There is a big range in the way different flours absorb liquid, so there is a normal range of variation in liquid needs. It should be easy to work with—soft and not too stiff and not excessively sticky.
- Use paper lollipop sticks or a skewer to make your holes.
- Use a 4-5 inch round cookie cutter to make handprint ornaments.
- Tie on baker’s twine or thin ribbon to hang as ornaments.
- Try to get the dough to an even thickness before baking so the ornaments bake evenly.
- Bake for the time indicated and then longer if your ornaments still feel soft. They should be firm to the touch without much give.
- Let cool fully before painting.
- If you want to paint the background of a handprint ornament, do that before you paint the inside of the hand. Let dry before adding a second color. Some people like to paint the whole thing white or cream to give it a more finished look.
- Use acrylic craft paint for older kids who can be trusted with paint and tempura washable paints with younger toddlers.since it holds up best on crafts. With younger kids who may wind up wearing more of the paint, I’d recommend.
- To help preserve your finished dried ornaments, you can coat with a layer or two of Mod Podge or spray with a sealer.
I’d love to hear your feedback on this project and what your kids thought of it, so please comment below to share!

The Best Easy Salt Dough
Ingredients
- 4 cups flour
- 1 cup table salt
- 1.5 cups water
Instructions
- Mix the ingredients together in a large bowl using a wooden spoon. When it becomes too stiff to stir, use clean hands to bring the dough together.
- NOTE: If the dough is too wet and sticky, knead in a little more flour, about 1 tablespoon at a time. If it's too stiff, add a little more water, about 1 tablespoon at a time. There is a big range in the way different flours absorb liquid, so there is a normal range of variation here. It should be easy to work with—soft and not too stiff and not excessively sticky.
- Knead a few times until the dough is uniform and soft, about 3-5 minutes.
- Divide dough into 2 or 4 sections and roll out to about 1/4-½ inch thick between two sheets of parchment paper. This will help prevent sticking.
- Cut out with cookie cutters. Transfer shapes to a parchment-lined baking sheet.
- Repeat rolling and cutting out shapes to use up the dough.
- Preheat oven to 250 degrees F.
- Do a 4-5-inch circle and press in a child's handprint if desired.
- Use a paper lollipop stick or a skewer to make a hole to hang as an ornament.
- If making ornaments, bake for 90 minutes to 2 hours; if baking handprints, bake for 2-3 hours. Continue baking both ornaments and handprints as needed until they are until just firm to the touch, checking every 20 minutes. (It's not a problem if yours take longer than the initial baking time—it varies based on thickness and size...which will likely vary if you are baking these with kids!) They do not need to be rock hard, but should not feel squishy. Handprints will likely take longer than smaller ornaments and may take closer to 4 hours.
- Remove from oven, let cool, and paint if desired with acrylic or washable tempera paint.
- Once paint is completely dry, seal with Mod Podge if desired.
Notes
- Divide the recipe in half to make a smaller portion of dough if desired.
- Use paper lollipop sticks or a skewer to make your holes.
- Use a 4-5 inch round cookie cutter to make handprint ornaments.
- Tie on baker's twine or thin ribbon to hang as ornaments.
- Try to get the dough to an even thickness before baking so the ornaments bake evenly.
- Bake for the time indicated and then longer if your ornaments still feel soft. They should be firm to the touch without much give but do not need to be rock hard. It is not a sign of a problem if yours take longer than mine did to bake—flours and ovens vary!
- Let cool fully before painting.
- If you want to paint the background of a handprint ornament, do that before you paint the inside of the hand. Let dry before adding a second color.
- Use regular acrylic paint for older kids who can be trusted with paint and washable tempera paint with younger toddlers.
- To help preserve your finished dried ornaments, you can coat with a layer or two of Mod Podge or spray with a sealer.


I halved the recipe to make for my 9 toddlers at daycare and still had dough leftover! We are making handprint ornaments for Mother’s Day and this recipe and craft was perfect for them!
Oh, that sounds perfect!
I baked mine in a glass oven dish and the top was dry and hard but when I took it out of the glass the bottom on the ornament that was touching the class was still soft. Any advice? Thanks
If you can switch it to a metal baking sheet and bake on a very low temp for a little longer, that should help.
Can I put these in a dehydrator?
I haven’t tried that so I can’t say for sure. Let me know if you test it out!
I made these with my kids when they were little. It was fun and funny because on my son’s Santa ornament his belly puffed up (like it should be) and my daughter was so upset that her Santa’s belly didn’t puff up too.
Can you make this earlier in the day and store it for an ornament party? How would you store for a couple hours?
Yes, just put the dough into a plastic storage bag, remove as much air as possible, and seal. Leave at room temp and you will be good. Enjoy it!
I want to make these ornaments with my students at school. Do they have to be baked, or can I let them dry instead?
They do need to be baked. You could make them and put them on a tray, cover with plastic wrap and bring them home to bake. Or you can use air dry clay instead to skip the baking.
Thank you for this recipe! It came out perfectly for my grandson’s little hands. My problem is with my panting. With two coats the acrylic craft paint has cracked. What did I do wrong? Can it be fixed with yet another thicker coat? Thank you for the help!
I would try another coat!
This recipe turned out perfectly for me! I did not need to add water or flour and the end product is great…ornaments are ready to decorate!
If I don’t use all the dough at once can I refrigerate it and continue later? Or will it dry out too much?
You can store it in a storage bag with as much air removed as possible!
My ornaments are rising and reading the handprints! Are they maybe too thin or is the oven too hot? Or perhaps I should let them dry before baking? I’m trying another batch again.:
I would make a little thicker and turn the oven down a little if you can. Have fun with it!
*erasing
How many ornaments would you guess this makes?
It depends on the size, but about 2 dozen at minimum.
They came out tasting like flour over anything else, and I weighed the ingredients on a scale so I’m not sure what went wrong.. unfortunate because they are so easy to make but I guess that’s why.
These are not edible, they are an ornament. Enjoy hanging them on your tree!
I’m sorry I meant to put this on a different site, I made muffins for my toddler and I also made these ornaments and accidentally added a comment on your site instead of theirs.
Your ornaments are lovely though!
Oh phew!
I think you have missed in step one when you said mix flour and water then add water. I believe you meant to put salt in there.
The Step 1 in the recipe at the end of the post simply says to add all ingredients to a bowl. Enjoy!
Awesome recipe! Have you found that coloring them with markers works well, as opposed to paint?
Sure, you can do that! I have had the best luck with permanent markers as it bleeds less.
Hi!
If I only want to make one handprint ornament, how many times should I divide the recipe? I truly only want one and don’t want to waste 🙂
I think 1/2 cup flour and 1/8 cup salt (so 1/8 of the recipe if I did the math right!)
hello! are these meant to be rock hard? they feel hard and dry when i take them out to oven but once they cool they become soft and bendable
These should be hard when cooled. If yours are still soft and bendable, they likely were not baked long enough.
C
If we didn’t bake them long enough initially, do you think it would be okay to put them back in the oven after they have already completely cooled, or would it be best to start over?
I think you can bake them more now.
Do you recommend gloss or matte mod podge for this? Do you have pictures with both?
I prefer matte
This was so much fun to do with my 4 year old. She used it more for fun playdoh and told me to bake her “rocks”… so we went with that! Much love! Thank you for sharing!!! I stored the rest that did not get baked into a ziplock bag and put in the fridge! Happy Holidays!
Can I let these air fry in my classroom for a few days instead of bringing them home to bake? Also how many ornaments will this recipe yield for 6-7 year olds? Thanks!
I haven’t tested this in the air fryer so I am not sure, but if you use the bake setting it may work similarly!
Hi there I want to make these with my preschool class. Would they be okay to refrigerate or let sit out until I take them home to bake?
Yep, that should work just fine. Have fun!
Does this work with gluten free flour? I am celiac and unfortunately just the use of regular flour in my kitchen makes me sick when I inhale it.
If you want to try it, use a gf all purpose flour.
We loved making these and they turned out great!
Thank you for the recipe!
My granddaughter made us a hand impression last year that our dog knocked onto the ground today and it chipped off a couple of pieces. We are lucky in that they can be lined back up into their original position but we’re not sure as to what the best type of glue or adhesive would be to use with this type of material. Any suggestions?
We appreciate any help in advance
Thank you.
I have had luck using a bit of hot glue to piece these back together. I would think that super glue would also work, depending on the size of the chip.
Hi! I’ve been doing this recipe for years with my toddler class, I love it! Does anyone know of a way to make the dough pure white so I don’t have to prime them with white paint before painting? Thanks!
I am not sure there is one, but it’s not that far off from white. The ones in the photos here aren’t painted other than the blue for the handprint.
Make sure to use bleached flour – that definitely helps!
Hi Alyssa, do make the dough in class? I’m looking to bring some dough to my daughter’s school for older kids to roll out and make. I’m wondering if the dough will keep if I make it the night before?
Hi Alyssa, do you make the dough in class? I’m wanting to make the dough and bring it to the school. Wondering how it would hold up from the night before. Any tips?
I’m wondering the same question. Did you try it?
I made a small test batch which did puff up so on the second batch I covered the tray with parchment paper then put a tray on top to weigh them down and it worked.
Hi there-
We used this method, but added cinnamon to make gingerbread ornaments. Do you happen to know if I seal them with Mod Podge, if it will take away the cinnamon smell since the sealer is so strong smelling? Also, if left without sealer, should they still hold up over time? Thank you!
Hi, they won’t hold up over the years as well without Mod Podge. I think adding it would take the cinnamon smell away. But I think that smell would fade over the year, regardless. Enjoy!
What type of modge podge is best to seal them with- gloss or matte? Or does it not matter? Have you found the spray sealer to be better than the regular modge podge?
I would use the spray, then the matte, then regular in order of preference.
Worked awesome. Dried mine in the dehydrator. No issues with curling.
I’ve made this today so easy to make
Will it be ok to use tomorrow or monday
Yes, just put the dough into a storage bag and seal, removing as much air as possible, or cover tightly with plastic wrap if you already rolled them out.
I’ve made this today so easy to make
Can make and use the next day
Can I use bread flour?
I haven’t tried it that way and I am not totally sure it would work the same. Let me know if you give it a try though.
The primary difference between AP flour and bread flour is the protein content. AP is typically around 10-11%, while bread flour is usually around 12-14%. The protein in flour is what turns into gluten when hydrated and kneaded, so bread flour tends to produce baked goods with a chewier texture than those made with AP flour. So while you don’t want to use bread flour for, say, baking a cake, I think it wouldn’t make much difference for a recipe like this since you aren’t going to be eating the ornaments.
I do this every year with my TK class for their handprints. Awesome project
Can you make the dough and roll it out, put it on parchment the night before??
Making it for 23 2nd grade students.
Should be fine! I would cover with plastic wrap so it stays nice and soft.
Super easy to follow but mine are baking at 3+ hours now – they’re firm to the touch but the bottom still seems undone and soft. Am I supposed to flip these at some point?
You can. There is a range in how long they take to bake so hopefully they finished up.
Could I add cinnamon to this for color and scent? How much would be ok without messing up the dough?
I haven’t tried it so I can’t say for sure, but you could start with 1/2 or 1 teaspoon and see how it is? I can’t imagine it would impact the dough’s consistency at that amount.
Can I use a Sharpie to write the date on these (concerned it might bleed)? Or do I need to use acrylic paint/paint pen?
If you are going to use a sharpie, I’d use a fine point one if possible!
I found that it was really difficult for my kids to make handprints with them. They might work better for cookie cutter ornaments.
Hi Amy – under the heading “How to Make Salt Dough Ornaments Step-by-Step” – the adding of table salt is left out. Could you add the salt to that set of instructions? I had a family member making these ornaments with my kids, and they missed adding the salt because they were following these instructions on your webpage. Thanks! Love your recipes!!
Hi- that section is just an overview and the full recipe is always at the end. I hope that helps and I will try to clarify it!
Can I make this dough ahead of time and refrigerate until I’m ready to roll it?
You can put it in a bag and seal it until you’re ready and in my experience it’s okay at room temp for 24 hours that way. The fridge should also be fine, but you’ll probably want to let it sit at room temp a bit as it will likely firm if cold.
I first made these back in 2021,,first time in my life I had ever tried something like this. After cooling for about 30-45 minutes,,me and 4 of my grands has the absolute best time painting them.
I first made these back in 2021,,first time in my life I had ever tried something like this. After cooling for about 30-45 minutes,,me and 4 of my grands has the absolute best time paint
Just made these with my three year old and she had an absolute blast! Any tips for if they puff up a bit? It’s not that big a deal, but some of the hand prints she made are a little harder to see now that they’ve been baked. I’m guessing it’s the flour — but if I do more salt than flour or maybe a little more water or something do you think that would help keep them flatter? I’m sure she’s going to want to make these like five more times at least before the season is through 😉
Check your flour isn’t self raising flour 😊
Poke fork holes maybe before baking just like a pie crust?.
You will have holes in the end result so I have never done that.
Can you use other flours such as wheat flour in stead of white flour
I haven’t tried that but I think it would work if you used a bit more water since it will absorb the liquid more readily.
I halved the recipe exactly and found the dough easy to work with but they are taking forever to dry and I’m very discouraged. I put them on parchment on a cookie sheet in the oven for 2.5+ hours, found them dry on one side but they looked glossy and darker on the parchment side, as if the dough is still wet. So I flipped them, let them air dry overnight, and baked them another 2.5+ hours. Still not dry. I’ve now got them in the oven on convection at 200 degrees.
Have I ruined them? Can I just bake them longer? Will they air dry the rest of the way if I hang them on our tree in our home for the next 3 weeks until Christmas? I have not sealed them yet. I made a hand print of our son and paw print of our dog, who is not doing well health wise, along with holiday cookie cutter shapes. I don’t really care if the cookie cutters don’t work out, I can just make new ones, but I will be crushed if this is the last holiday we have with our dog and his paw print gets moldy and needs to be thrown out. I also understand the two prints might take longer to dry because they are thicker but they’ve been in the oven for 7+ hours at this point and don’t look even close to being dried out, nor do the Christmas cookie shapes, which are about 1/4 inch thick. Is there any way to salvage the ornaments I have or should I start over?
It should be fine to bake them longer. If they were thicker, that could explain it.
Several years ago, I made “chocolate covered ice cream” on craft sticks one Christmas for the ladies in a group I was in as a little “stocking stuffer” gift… they were about 2″ wide x 4″ tall by about 1/2″ to 1″ wide… I looked around to see if I could find a soda bottle cap but none anywhere, so I bit a small piece from the corner on all of them to give a more realistic look to them… then I baked them in the oven on about 300* F until they were dry… after they were cool I painted them with brown acrylic paint… the ladies loved them… I need to share your recipe to my niece so she can make some Christmas ornaments with her children… I hope you enjoyed my nostalgic memory… Sorry if it was too long…
Thanks for sharing!
Love your comment.
The amount of ingredients is all the way at the bottom of the page and was very hard to find.
Do these need to be baked immediately after cutting out and doing handprints?
They’re okay to sit for a while if needed. You can leave them at room temp.
you do not necessarily need to bake them, you can also air dry them… baking just speeds up the process for a quicker result…
They really do not dry out completely without baking them. Maybe another recipe would but I have left these for days and they are still wet on the bottom so they should be baked. Thanks for commenting!
If I have my preschoolers cut them out and do handprints at school, can I bake them later at home? Or do they need to be baked immediately?
That should be fine!
I’m not seeing how much water to use.. Any tips?
It’s in the recipe at the bottom!
Can I insert a mental paper clip into the dough at the top before baking; instead of making holes for the ribbon?
I haven’t tried that but it might work!
I made these today and they came out perfectly. I rolled them to about 5mm thick, and had no puffing or cracking. I didn’t air dry them first either.
I doubled the recipe and baked them on a cooling rack at 95°C for about 2.5 hours or so. I turned them with 30 min to go which probably wasn’t necessary.
Can you use food coloring in the dough before making the ornament?
Sure!
I was wondering if I could line cookie sheet with foil instead of parchment paper?
That should work okay I think. You could spray very very lightly with nonstick spray to make sure they don’t stick.
Perfect recipe for salt dough
I made these this week and they turned out excellent. I used “iodized salt”. I halved the recipe and it still made plenty. A couple of mine did puff up. I think it was the ones i rolled out too thin. I let my daughter “help” paint on the white with washable paint and then filled in the handprints with acrylic paint. Some of the washable paint dried slightly crackled but the acrylic worked perfectly. I’ve made “better than salt dough” handprints in previous years that cracked. These did not crack. I’ll make them again next year!
I’m so glad to hear that and I appreciate the comment!
Is there any way you could send me the recipe that you have if different than the one listed above. These will be a gift for my mother.
Thank you so much!
Lacey
She mentioned that she used this recipe, she just cut the amounts in half. Enjoy it! (I took your email off for your privacy.)
Her is my question… can i make the dough and refrigerate for later, thanks !
Yes just put it into a storage bag, remove as much air as you can, and seal first.
If I want to make it the day before. Do I refrigerate it or just leave it out on the counter? Thanks!
If you put it into a storage bag, remove as much air as possible and seal it, you can do either room temp or the fridge.
Can we use Himalayan salt half with half table salt ? I ran out of table salt! Lol
If it’s coarse, it won’t blend in that well and you may be able to see the crystals. So that’s the one thing to consider. Otherwise you probably could
How long do you bake the salt dough ornaments for?
The recipe is always at the end of my posts.
Was I suppose to flip them?
I never have
I’m making these with my toddler, which means some mild chaos. If I were to make the dough the night before, would it stay soft if well-wrapped and in the fridge? Thanks! So excited to make some ornaments–the perfect Montessori gift (and activity!)!
Yes or at room temperature. As long as it’s wrapped well (I like to put it into a plastic storage bag, remove all the air, and seal), the fridge or room temperature overnight should both be fine. have fun!
Need measurements
They’re always at the end of the post.
Sorry my last comment sent before I was finished writing it! My friend sent me some ornaments to decorate but they still feel a bit squishy. Is it too late to bake them longer now that they have already cooled?
It should actually be okay to stick them back into the oven for a bit now.
Do these do well air dryed?
No, they won’t dry all the way through without baking.
Lol at the nutritional value. I was expecting a “please don’t eat this” comment 🤣
WOULD YOU PLEASE ADD NOTE TO THE RECIPE TO WARN EVERYONE THAT SALT DOUGH OR AMENTS ARE FATAL IF YOUR DOG EATS THEM. THEY WILL DIE FROM THE AMOUNT OF SALT. VETS WARN OF IT ALL THE TIME AND MOST PEOPLE JUST DONT KNOW AND ARENT AWARE.
THEY WILL JUMP UP TO THE TREE OR SHELF TO ACCESS THEM SO HANG THEM VERY HIGH AND OUT OF REACH. THANK YOU
Sorry but your comment should be common sense. Dog owners should not need a warning, I have mine low enough for the pup’s to reach and they leave them alone but that’s just mine.
Great recipe, thank you very much! ❤️🎄🎅🤶☃️
Looking forward to making these with my toddler! Do you think if we use washable tempera paint and don’t seal, will the paint rub off after drying? (Just wondering if I can skip the sealing step after painting.)
I don’t think that would be likely, no. Have fun with it!
Thank you!
Hi. I want to try this. Please tell me why we use Modge podge? I’m not familiar with it. Also,can I use glitter after or before modge podge? Do I use a special kind of glue to hold the glitter?
It helps make it look a little more finished and can look glossy depending on the type you buy. You could use it to adhere glitter, just like glue. Spread it on and while wet add the glitter right on top and it will stick.
I’ve tried this recipe twice now, but both times I left the ornaments in the oven for several hours longer than instructed but the back side still comes out soft to the touch. Even after flipping them over part way through the bake. I’m worried about them molding, which defeats the purpose of these keepsake ornaments…
Have they still been soft when they’ve totally cooled down?
I had the same issue…maybe the outer crust hardens quickly before the middle can also fully harden. Was thinking of trying again and making them thinner
I made a large batch for preschool, rolled it out on parchment and cut it into 4 inch squares the night before, vacuum sealed it, and put it in the fridge. It was perfect the next day. When the kids used a cookie cutter and took off the extra dough we wrote their name on the parchment. I didn’t want to take any chances so I baked them at 200 on a cooling rack with the parchment for a bit longer and they came out perfect. Even the glitter they sprinkled on top mostly stuck.
I’m so glad to hear that and what a wonderful project to share with the kids!
Thanks! Just FYO, your written instructions on how to make step by step with the photo references says for 1. measure out the flour and water. I believe you meant measure out the flour and salt as that goes with photo 1.
Cheers
Mine came out good when I baked them right away. Some dough sat for a bit and when I used it, the ornaments puffed.
Water bottle caps also work great for paint and finger paints! Learned that from my 14 year old son 🤭 ol smartly pants
Smart!
This is the first year that I’ve heard anyone have an issue with dough puffing and from what I can tell (since I have never been able to replicate this issue) is that the two reasons it would happen are if you mistakenly used self-rising flour or if perhaps your oven runs hot so the temp is actually warmer than 250. You could try baking lower at 200 or 225. I am sorry that happened though!
I had the same issue so partway through I turned the heat down. Made mine with GF flour blend that has xantham gum so that may have contributed.
I painted them before I baked them because I didn’t read (Whoops!). Still came out really nicely though.
I am trying this now didn’t realize it took so long guess that’s what i get for not reading the instructions fully lol
I made with my younger son for gifts like 10 years ago and are still in great shape. We lived in an apartment that was heated with radiators so I just set the trays on them overnight and in the morning they were done (I lived in Pennsylvania so it was cold outside). Before sealing them I put his name and year on back with a Sharpe.
Great recipe. I quartered it and it worked greag. But My paint cracked. anyone else experience this? Should I have used acrylic and not washable?
Yes probably why she suggest acrylic or washable tempura paint.
Hi what temperature do you cook the handprints on. I read the pre heat temperature but wondered if 250 degrees F is too high to cook them at?
That’s the temp to bake them at!
This is very helpful and inspiring! Thank you! A question – I’m making the dough to be used at a class holiday party. Do you think I can pre-prepare the individual shapes and store them piled with wax paper or cellophane between them, so they can be easily divided/distributed once in class? And also if they aren’t baked would they simply dry in 24-48 hours? Thank you again!
Hi- You could make them ahead but I think you’d want them in a single layer on baking sheets or cardboard if you’re planning to transfer them unbaked as they’ll have the consistency of playdough. They do not dry thoroughly just by letting them sit out. They do dry some, but not hard. I hope you have a great time!
Came out great and such a nice keepsake. I made them for the grandparents for homemade gifts too. My one year olds also got a kick out of it! I had to keep adding more dough to get this to work right but just thoroughly read her directions as she stated all flours are different. Thanks for tbis cheap and fun activity!
Can I use iodized salt?
I haven’t heard that that doesn’t work so I think so!
I am wondering what kind of paint to use on cookie dough ornaments.
I prefer acrylic craft paint but most will work as long as you don’t use watercolors.
I am wondering what kind of paint to use on cookie dough ornaments.
hello
I made half of the recipe. The dough was soft and easy to work with. I measured the ingredients using a digital scale, as i bake bread this way. Anyhow, I made 2 handprints of my grandson and did a cookie cutter Snowman. After 1 hour I checked their progress in my oven, and saw they were quite puffy, looking like “pita” bread! I flipped them over, and feeling they were still soft, kept them in for awhile longer. I’m disappointed, but hope to try again. Any suggestions are appreciated. Thanks.
The only reasons that I know of that would cause this are if you mistakenly used self-rising flour or if your oven runs hotter so the temp was actually warmer than 250. You could try baking at a lower temp if you see that happening again.
This happened to mine too! I followed the metric weights using my kitchen scale. My oven temps tend to be accurate with all other baking projects. I made a handprint which looks puffed like a pita and a bunch of cookie cutter stars, which did not puff much at all. I am in Colorado so perhaps it’s due to the altitude? I’m bummed about the hand print but may try again and I don’t fault the recipe! It’s just a curious thing.
It is possible it could be altitude related!
Does the raw ‘dough’ keep in the fridge if you need to break the activity into a couple of days rather than having to make up a new batch each day?
Yes, just put it into a plastic storage bag, remove as much air as possible, and seal it. Keeping the air out is the main thing but it stores well!
Going to do this! Do you still roll the dough 1/4-1/2 inch thick for handprints, or does it need to be thicker?
I would do it about 1/2-inch. If it’s much thicker than that, it will take ages to bake through until firm and that gives enough thickness to make the indentation nicely. Have fun with it!
I made some last week and it came out nice. But after painting on it using a thin coat of acrylic and letting it dry, the ornaments softens and became “bread like.” What did I do wrong?
It’s possible that they didn’t bake quite long enough or that the humidity is high in the house. You could bake them a little more to help dry them out.
I live in Fl where the humidity is high, I put them in the microwave that’s above my stove and turn on the surface lights and left them for overnight, was nice and hard the next morning.
Awesome, thanks for sharing that!
did you pit them in the microwave instead of oven? and how long did you keep in microwave.
My understanding of that comment was that she put them in there with it turned off to dry them out in an area that was freer from humidity. Hopefully she’ll share more though!
Not sure if I missed this information, but approximately how many ornaments will one batch make? I want to do this with a class of 24 children.
About 2 dozen 2-3 inch ornaments. I would probably double the recipe to make it for a class that size. Have fun with it!
Can I use a white whole wheat or self rising flour (that’s all I have) ?
It’s possible that white whole wheat would work, but I haven’t tried it to say for sure. I would not use self-rising.
So fun
Thanks for the instructions and guidance, the dough was easy to make and fun to work with. Have you ever turned them over? Our top looks tough but the bottom is “wet”. The kids really enjoyed the activity and the flour recipe was great, thanks!
I haven’t done that but you certainly could if the tops were set firmly!
Thank you for recipe and the instructions, the dough was easy to make and fun to work with!
Is it possible to make mugs out of it?
And use the mugs?
I am worried that the water will go inside of it and make it into dough again
I don’t think they would hold up well if you put water in them. You’d want a real clay for that!
Can you save left over dough
Put it in a zip top bag with as much air removed as possible and store in the fridge for up to 3 days. Let sit at room temp for a bit to soften up before using.
Do you ever flip these while baking? The tops of ours seem hard but the underside is “wet”. Kids really enjoyed this activity and the dough recipe was great, thanks!
I haven’t tried that but it seems like it could work! (Sorry that I wasn’t able to respond to this earlier!)
I made hand print ornaments with my one year old and it was a lot of fun! I followed the directions exactly and everything turned out great. Thanks for another fun activity!!
Should you write on the ornaments with a permanent marker before or after applying the mod podge sealer?
I think I would do it after it’s totally dried
Mine came out brown /burnt? Left 2hrs like said? What did I do wrong
Did you bake them at the temperature in the post? I haven’t had that happen since the temp is so low and typically mine have always taken longer. I am sorry to hear that you experienced that though!
Hi- just wanted to remind readers that salt dough is toxic to dogs (and they find it very tempting). Please keep out of reach of reach of your pups.
Our ornaments were hard, but after painting they are soft again! Would it be possible to put them in the oven again after they are painted?
I haven’t done that, but I think it would be fine since the temperature is so low
My ornaments were dry and hard when I took them out of the oven, but softened up again after I applied the Mod Podge. Is there a way to salvage these?
Are they soft with the Mod Podge fully hardened?
Can I use iodized salt instead of table salt?
I have only used table salt but I would think that would be okay
I am making this right now and you said for 2 hours but ita been in for 10 minutes ans their already hard are they done?
After 10 minutes of baking at the time in the recipe, I would be surprised if they are super firm unless they sat out for a while before you baked them?
Woukd it work to use markers instead of paint for younger kids?
It probably would though you’d have to try a few kinds and see what shows up.
Can you use pastry flour if that’s what you have on hand?
I haven’t tried that so I can’t say for sure!
I tried to make handprint ornaments with my almost two-year-old. I added extra water while mixing, but it was still a very “firm” dough, even though it came together. My poor boy was nearly in pain pushing his hand in (clearly I stopped!!) and hardly got indents. They weren’t worth keeping. I was afraid of adding too much water and having sticky dough, but would that still work?
If it’s too firm to roll out or push into, then yes you could add a little more water and knead it again. (There’s a big difference in flour as far as how much water you need!). I hope that helps
can you make ahead of time and if so how do you store it and how long?
Someone just commented that they stored it in a zip top bag in the fridge for 3 days and it was fine. Try to remove as much air as you can and be sure to seal it tightly. Let it come back to room temp if you can before rolling.
I made these last night and baked for close to three hours and thought they were hard. But this morning they felt a bit squishy. I tried baking them again, but nothing changed. Is a little squish okay or should I redo it?
As long as they aren’t super soft, they should be okay if they aren’t rock hard!
Best one yet! I have tried sooo many different recipes but this one is it! I poke holes in them to prevent them blowing up or making bubbles . I didn’t know what temp the water should be so I just used semi cool water. Thanks so much!!
I am so glad to hear that!
What temperature should I set the oven? Thanks
All of the specifics are at the bottom!
Can I make the dough ahead of time? Like a couple days?!
I haven’t tried that and can’t say for sure if it would stay moist. If you try it, be sure to seal it in a zip top plastic bag and remove as much air as possible. I’m not sure I would attempt to do it more than a day ahead if possible…
I am a preschool teacher and one of my colleagues made salt dough ornaments for her class. She had some leftover and gave it to me to make ornaments for my children at home. I stored it in the fridge in a ziploc bag for about 3 days before I used it.
Our ornaments turned out great.
Doughs hard and crumbling what do I do 🙁
It sounds like you need to add a little water until the dough comes together and is easy to handle. Different flours absorb water differently so this is totally okay, just add a small amount at a time!
I was looking for a salt dough that I could try for handprints with my infant (7mo). I tried another recipe before I found this one and it was too tough to work with. I am so glad I found this one. This dough was the perfect consistency and rerolled nicely. I did add a touch more water than indicated so the dough was not too dry. I made a half recipe and got six 4″ circles with handprints. Some of my dough did puff a bit in the oven, but perhaps it was because I was rerolling the dough.
Baked for about 2 1/2-3 hours, I pulled some out while the others were still soft. For anyone looking to do handprints with a busy infant, I found it best to occupy one hand while you press the other into the dough. I placed him in his highchairs and did one at a time, using parchment paper to transfer it back and forth. Just work quickly! Thanks for the great recipe, I can’t wait to gift these to the grandparents for my babies first Christmas.
What am I doing wrong if they get big bubbles in them?
You could try decreasing the oven temp a little.
Thank you for posting this! Can I use tin foil instead of parchment paper for the bottom layer? Or do you recommend any alternative? Trying to see if I can work with what I have ?TIA
Hi- I haven’t tried it with anything else but I think you could use foil but maybe grease it lightly with nonstick spray (and then pat the bottoms dry when they are baked).
What flour is best? Please
Regular all purpose flour
These worked perfectly for us!
I wasn’t terribly precise measuring the flour, so ended up needing to add an extra 1/2 c of water. I started it in my kitchen aid, but the motor was struggling. So, we finished kneading the dough by hand.
Baked as directed. I checked them after 2 1/2 hours and they were done.
Thank you for a successful recipe!
I’m so glad!
What temperature do you cook at
All of the info is at the bottom of the post in the recipe card!
Fun!
4 hours and counting despite being the thinner side of what was recommend!
I did say that you may need to bake longer—it can vary based on the specific flour you use and your oven. I hope they worked out in the end!
This was easy and fun
Super easy to make my 4 yo loved it. I cant wait to try it with my 5yo and 7yo after school !!!
Thanks for such a lovely project! Great idea ??♀️
What temp do I cook it at?
250 F. The specifics are in the recipe at the bottom of the post!
Mine puffed up like an air bobble inside?
How long can we save left over dough?
I’d try to use it within a few days. Put it in a plastic storage bag and seal, trying to remove as much air first as you can.
My dough seems really sticky. When I pull my child’s hand out of the dough it sticks to his fingers creating an abnormal handprint. Any suggestions to help with this? Thanks!
It sounds like it need a little more flour. I’d mix in a little more and try rolling and printing again!
How do I prevent the ornament from bubbling up in the oven???
Bubbling like with an air pocket or bubbling like fizzing? (I hope it’s the former!) You could just leave it be as it will likely settle down when it comes out or you could pop it with a toothpick if it’s early in the baking. I haven’t had this happen but I appreciate knowing that it’s happening to you!
Thanks for the recipe, perfect for lockdown- do you have the quantities in metric? I’m in the U.K.
Thank you, Lucy x
I don’t but you could use an online converter!
Can i have the propper Recipe please
It’s at the bottom
These are perfect for baby’s first Christmas!
They are! (Even if baby hands don’t like to stay still for very long:)
This was the perfect activity for me and the kids this afternoon and they can’t wait to give them as gifts this season. They’re SO PROUD!
High fives all around!
My 7 year old twins loved making these! Such a great idea for the holidays!
That makes me so happy to know, thanks for sharing!
We loved your sugar cookie project so much, now cannot wait to try these!
I’m so glad to hear that!
We made these darling ornaments yesterday. They were easy and will make special presents !